Eaz-Lift Recurve R3 Manual: A Comprehensive Guide
This manual provides detailed instructions for the Eaz-Lift Recurve R3 weight distribution hitch, covering installation, operation, maintenance, and safety procedures.
Access the PDF version for step-by-step guidance, parts lists, and warranty details, ensuring a secure and optimized towing experience.
It’s available in English only, with specifications for various lengths and weight capacities.
The Eaz-Lift Recurve R3 is a weight distribution hitch designed to enhance towing safety and comfort. This system effectively redistributes trailer weight, minimizing sway and improving vehicle handling.
It’s engineered for a smoother ride, reducing stress on your tow vehicle and trailer components.
This manual serves as a comprehensive guide, detailing the hitch’s features, installation process, and operational procedures.
Understanding the principles of weight distribution is crucial for safe towing.
The Recurve R3 incorporates adjustable sway control, providing added stability during travel. Proper installation and regular maintenance, as outlined in this manual, are essential for optimal performance and longevity.
Always refer to this guide for detailed instructions and safety precautions.
What is a Weight Distribution Hitch?
A weight distribution hitch is a crucial towing component designed to level the weight exerted by a trailer on a tow vehicle. Without one, a significant portion of the trailer’s weight rests directly on the rear axle, potentially causing instability and compromised handling.
These hitches utilize spring bars to redistribute weight across all axles of the tow vehicle, improving steering and braking performance.
The Eaz-Lift Recurve R3 system achieves this by transferring a portion of the trailer’s tongue weight to the front axle, creating a more balanced weight distribution.
This results in a smoother, safer, and more controlled towing experience, especially with heavier trailers.
Properly functioning weight distribution is vital for vehicle stability and preventing excessive sway.
Key Features of the Recurve R3 System
The Eaz-Lift Recurve R3 boasts several key features enhancing towing safety and convenience. Its integrated sway control minimizes trailer movement, providing a stable ride even in challenging conditions.
The system’s unique design allows for adjustable tension, optimizing weight distribution for various trailer and vehicle combinations.
Constructed with durable materials, the R3 ensures long-lasting performance and reliability.
The spring bars are designed to work in conjunction with the hitch head, effectively redistributing weight.
Easy installation and adjustment make the Recurve R3 a user-friendly solution for a more comfortable and secure towing experience.

Installation Instructions
Follow these steps carefully for proper installation: prepare the vehicle, install the hitch head, attach spring bars, connect to the trailer, and adjust tension.
Step 1: Preparing the Vehicle
Before installation, ensure your vehicle is parked on a level surface and the parking brake is firmly engaged. Verify the receiver tube is clean and free of any debris or rust.
Inspect the hitch ball for wear and ensure it meets the specified ball size requirements for the Recurve R3 system.
Confirm the vehicle’s weight capacity is sufficient for the combined weight of the vehicle, trailer, and cargo.
Double-check all connections and hardware are present and in good working condition before proceeding with the next installation step.
Proper preparation is crucial for a safe and effective installation process.
Step 2: Installing the Hitch Head
Begin by sliding the Eaz-Lift Recurve R3 hitch head into the vehicle’s receiver tube. Secure it firmly using the appropriate hitch pin and safety clip, ensuring it’s fully seated.
Verify the hitch head is level before proceeding; adjustments may be needed based on your vehicle’s receiver height.
Inspect the hitch head components for any damage or wear, paying close attention to the locking mechanisms.
Ensure the hitch head is properly aligned with the trailer coupler before attempting to connect the spring bars.
A secure hitch head installation is fundamental for safe weight distribution.
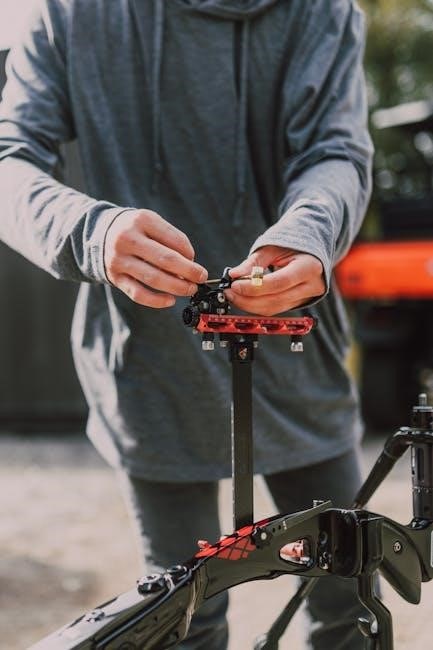
Step 3: Attaching the Spring Bars
With the hitch head installed and the trailer connected, carefully lift each spring bar into position. Insert the spring bar’s socket end into the hitch head’s designated slot, ensuring it seats correctly.
Secure the spring bar with the provided lock pin, verifying it’s fully engaged and locked.
Repeat this process for the second spring bar, maintaining even tension on both sides.
Keep the socket-mounted ends of the spring bars and lock pins free from dirt and debris to ensure smooth operation.
Avoid damaging the lift bracket during this step; proper alignment is crucial.
Step 4: Connecting to the Trailer
Before connecting, ensure the trailer coupler is at the correct height for the hitch ball. Carefully align the trailer coupler with the hitch ball and lower it smoothly until fully seated.
Verify the coupler is securely locked onto the ball, engaging the locking mechanism.
Connect the safety chains, crossing them under the trailer tongue and attaching them to the tow vehicle’s chain anchors.
Ensure sufficient slack exists in the chains for turning, but avoid excessive looseness.
Finally, connect the breakaway cable to the tow vehicle, providing a crucial safety backup.
Step 5: Adjusting the Tension
Proper spring bar tension is critical for weight distribution. Begin by lifting the trailer tongue slightly using the tow vehicle.
Insert the lift brackets into the spring bar slots, selecting the appropriate hole based on the required tension.
Ensure both sides are adjusted equally for balanced weight distribution.
Gradually increase tension, observing the vehicle and trailer’s behavior.
Aim for a slight compression of the spring bars, indicated by a level trailer and improved steering control.
Avoid over-tensioning, which can cause a harsh ride and potential damage.

Operation and Usage
Understanding tension adjustment, proper hitching, and un-hitching procedures are key. The Recurve R3’s sway control enhances stability during towing operations for safer travels.
Understanding Tension Adjustment

Proper spring bar tension is crucial for optimal weight distribution and vehicle handling. Adjusting the tension ensures the hitch effectively transfers weight from the trailer to the vehicle’s axles, improving stability and reducing sway.
Begin by ensuring the trailer is level. Observe the coupler and adjust the hitch head to achieve a level trailer platform. Then, incrementally adjust the spring bar tension using the adjustment points on the hitch head;
Monitor the vehicle’s suspension; it should exhibit a slight compression. Avoid over-tensioning, as this can negatively impact ride quality and handling. Refer to the manual for specific tension guidelines based on your vehicle and trailer weight.
Regularly check and readjust tension as needed, especially after changes in cargo load.
Proper Hitching Procedure
Before hitching, ensure the vehicle and trailer are aligned. Back the vehicle slowly and directly towards the trailer coupler. Lower the coupler onto the hitch ball, confirming a secure connection with an audible click.
Next, raise the trailer until the spring bars are slightly compressed but not fully engaged. Secure the locking pins into the hitch head, ensuring they are fully seated. Double-check that all connections are tight and secure before proceeding.
Always verify the sway control arms are properly positioned and functioning. Finally, adjust the spring bar tension to achieve optimal weight distribution and a level trailer platform.
A pre-trip inspection is vital for safe towing.
Un-hitching Procedure
To unhitch, begin by lowering the trailer until the spring bars are fully relaxed and no longer bearing weight. Carefully remove the locking pins from the hitch head, ensuring they are safely stored. Raise the trailer slightly to clear the hitch ball, then gently pull the vehicle forward to disconnect the coupler.
Once disconnected, inspect the hitch ball and coupler for any signs of wear or damage. Remember to keep the socket-mounted ends of the spring bars clean and free from debris.
Properly store the hitch components to prevent damage or loss. Always prioritize safety during the unhitching process, and ensure the area is clear of personnel.
Sway Control Functionality
The Eaz-Lift Recurve R3 incorporates adjustable sway control, designed to minimize trailer oscillation and enhance stability during towing. This functionality works by applying resistance to lateral movements, effectively counteracting external forces like wind gusts or uneven road conditions.
Adjusting the sway control settings allows you to fine-tune the system’s responsiveness based on your specific trailer and vehicle combination. Proper adjustment is crucial for optimal performance; too little control may result in sway, while excessive control can cause binding.
Regularly inspect the sway control components for wear and ensure they are functioning correctly to maintain a safe and controlled towing experience.

Maintenance and Safety
Regular lubrication, inspection for wear, and cleaning are vital for optimal performance and longevity. Always prioritize safety precautions during hitching, towing, and unhitching procedures.
Lubrication Points
Maintaining proper lubrication is crucial for smooth operation and preventing premature wear of your Eaz-Lift Recurve R3 system. Specifically, focus on the hitch head assembly, ensuring the socket-mounted ends of the spring bars and lock pins remain free from dirt and debris.
Apply a quality lubricant to these areas regularly, especially after exposure to harsh conditions like rain, snow, or road salt. Grease the ball socket to facilitate easy coupling and uncoupling. Periodically lubricate the pivot points within the hitch head itself.
Avoid over-lubrication, as excess grease can attract dirt and grime. A light coating is sufficient. Regularly inspect these points during your pre-trip checks to ensure adequate lubrication is maintained, contributing to a safer and more reliable towing experience.
Inspecting for Wear and Tear
Regular inspection is vital for ensuring the continued safe operation of your Eaz-Lift Recurve R3 weight distribution hitch. Carefully examine the hitch head assembly for any signs of cracking, bending, or deformation. Check the spring bars for fatigue, corrosion, or damage to the protective coating.
Inspect all hardware – bolts, pins, and washers – for wear, corrosion, and proper tightening. Pay close attention to the ball mount and ensure it’s securely attached and free from damage. Look for any loose connections or unusual play in the system.
Replace any worn or damaged components immediately. Consistent inspection and timely replacement of parts will help prevent unexpected failures and maintain the integrity of your towing setup.
Cleaning the System
Maintaining a clean Eaz-Lift Recurve R3 hitch is crucial for smooth operation and longevity. Regularly wash the hitch head assembly, spring bars, and ball mount with mild soap and water to remove road grime, dirt, and debris. Avoid using harsh chemicals or abrasive cleaners that could damage the finish or components.
After washing, thoroughly dry all parts to prevent rust and corrosion. Pay particular attention to the lock pins and ensure they are free from dirt buildup. Lubricate the moving parts after cleaning, as detailed in the lubrication section of this manual.
A clean hitch operates more efficiently and allows for easier inspection of wear and tear. Consistent cleaning contributes to the overall safety and reliability of your towing experience.
Safety Precautions During Use
Always adhere to safe towing practices when using the Eaz-Lift Recurve R3. Never exceed the hitch’s weight capacity, and ensure the trailer is properly loaded with weight distributed evenly. Regularly inspect all connections – the ball mount, hitch head, spring bars, and trailer coupler – before each trip.
Avoid sudden braking or sharp turns, as these can induce sway. Monitor the hitch during the first few miles of a trip to confirm proper operation and tension adjustment. Keep the spring bar sockets and lock pins clean to prevent binding.
Never modify the hitch or use non-approved accessories. Prioritize safety and consult the complete manual for detailed guidelines and warnings.
Parts List and Identification
The Eaz-Lift Recurve R3 system includes a hitch head, spring bars, and necessary hardware. Detailed component breakdowns and specifications are available within the manual’s parts list.
Hitch Head Components
The hitch head is a crucial assembly of the Recurve R3 system, featuring several key components. It includes the main hitch body, designed for secure ball mount attachment, and integrated lift brackets that facilitate spring bar engagement.
Inspect the coupler, ensuring it’s compatible with your vehicle’s ball size, and verify the lock pins are functioning correctly to secure the spring bars. Maintaining these components free from dirt is vital for smooth operation.
Pay close attention to the 12-degree and -3-degree angles indicated on the hitch head, as these are critical for proper trailer leveling. Regular inspection of these parts will ensure safe and reliable towing performance.
Spring Bar Details
The spring bars are essential for weight distribution within the Eaz-Lift Recurve R3 system, transferring trailer tongue weight to the vehicle’s axles. These bars are designed with specific tension characteristics, influencing the overall ride quality and stability.
Ensure the socket-mounted ends of the spring bars are clean and free of debris to allow for proper engagement with the hitch head. The bars’ length and curvature are critical for achieving optimal weight distribution.
Regularly inspect for any signs of bending, cracking, or fatigue, as compromised spring bars can significantly impact towing safety. Proper adjustment of tension is key to maximizing the benefits of these components.
Hardware Specifications
The Eaz-Lift Recurve R3 utilizes high-strength steel components throughout its construction, ensuring durability and reliability. Bolt sizes and grades are critical for secure assembly; refer to the parts list for precise specifications.
The hitch head features robust locking pins designed to withstand significant shear forces. Spring bar material is engineered for flexibility and resilience, maintaining consistent tension over time.
Weight capacity varies depending on the kit selected – 600lb, 800lb, or 1200lb – so choose accordingly. Ball size requirements are typically 2” or 2 5/16”, confirming compatibility with your vehicle’s receiver.

Troubleshooting Common Issues
Addressing sway, tension adjustments, and noise is crucial. Ensure spring bars are properly seated and lubricated, and check for loose connections to resolve common operational problems.
Excessive Sway
If experiencing excessive trailer sway with your Eaz-Lift Recurve R3, first verify the hitch is correctly installed and all connections are secure. Ensure proper tension adjustment; insufficient tension is a primary cause of sway.
Inspect the spring bars for any signs of bending or damage, and confirm they are fully seated within the hitch head. Check the trailer tires for proper inflation, as uneven pressure can contribute to instability.
Verify the weight distribution is balanced, avoiding excessive tongue weight. Confirm the sway control friction is adequately adjusted, increasing it incrementally until sway is minimized. Finally, remember that external factors like wind and road conditions can also influence sway.
Difficulty Adjusting Tension
If you encounter difficulty adjusting the tension on your Eaz-Lift Recurve R3, begin by ensuring the hitch head is properly aligned with the trailer coupler. Verify the spring bars are clean and free of debris, as this can impede smooth movement within the hitch head.
Confirm the lift brackets are securely mounted to the trailer frame and are not obstructed. Check that the ball mount is the correct height for your vehicle and trailer combination.
If tension remains difficult to adjust, slightly loosen the hitch head U-bolts to allow for easier spring bar manipulation, then retighten once the desired tension is achieved. Avoid excessive force, and always refer to the manual for recommended torque specifications.
Noisy Operation
Occasional noises during operation of the Eaz-Lift Recurve R3 are normal, particularly during initial setup or over uneven road surfaces. However, persistent or excessive noise warrants investigation. Ensure all components are securely fastened, specifically the U-bolts on the hitch head and the spring bar lock pins.
Lubricate all pivot points, including the hitch head, spring bar sockets, and lift bracket connections, using a suitable lubricant. Inspect the spring bars for any signs of wear or damage, as these can contribute to noise.
Verify the trailer coupler is fully seated on the hitch ball. Keep the spring bar ends and lock pins free from dirt and debris to prevent rattling.

Warranty Information
The Eaz-Lift Recurve R3 system is covered by a warranty against manufacturing defects. Review the detailed coverage specifics and the outlined claim process for assistance.
Warranty Coverage Details
Eaz-Lift warranties its Recurve R3 weight distribution hitch against defects in materials and workmanship from the date of original retail purchase. This warranty covers components like the hitch head, spring bars, and hardware, ensuring proper function under normal use.
The warranty period varies depending on the component, with specific durations outlined in the full warranty document. It does not cover damage resulting from misuse, abuse, improper installation, accidents, or modifications.
Regular maintenance, as described in this manual, is crucial for maintaining warranty validity. Proof of purchase is required for all warranty claims. Eaz-Lift’s obligation under this warranty is limited to repair or replacement of the defective part, at their discretion.
Claim Process
To initiate a warranty claim for your Eaz-Lift Recurve R3, first, gather your original proof of purchase and a detailed description of the defect. Contact Eaz-Lift’s customer support team, providing your hitch’s model number and date of purchase.
You may be asked to submit photos or videos documenting the issue. Eaz-Lift will then assess your claim and, if approved, issue a Return Merchandise Authorization (RMA) number.
Return the defective part, along with the RMA number, to the designated address. Shipping costs for the return may be the responsibility of the customer. Upon receipt and verification, Eaz-Lift will either repair or replace the defective component.
Technical Specifications
The Eaz-Lift Recurve R3 offers varying weight capacities and dimensions, accommodating different towing needs. It requires a specific ball size for optimal performance.
Weight Capacity
The Eaz-Lift Recurve R3 weight distribution hitch is available in several kits, each designed for specific gross vehicle weight ratings (GVWR) and tongue weight capacities. Understanding these limits is crucial for safe towing.
Kits range, for example, up to 1200 lb capacity with 2-inch ball size options. Always verify the correct kit selection based on your trailer’s weight and your vehicle’s towing capacity as specified by the vehicle manufacturer.
Exceeding the weight capacity can compromise vehicle control and potentially damage the hitch system. Refer to the detailed specifications within the owner’s manual or on the product packaging to determine the appropriate weight limits for your specific Recurve R3 configuration.
Proper weight distribution is key to a safe towing experience.
Dimensions
The Eaz-Lift Recurve R3 weight distribution hitch system’s dimensions are important for ensuring proper fit and clearance within your vehicle and trailer setup. While specific measurements vary slightly between kits, understanding the overall size is essential.
The hitch head assembly has a length of approximately 35.13 inches. The spring bars contribute to the overall length and are designed to accommodate various trailer heights and vehicle configurations.
Carefully assess the available space in your vehicle’s receiver and around the trailer coupler to confirm compatibility. Detailed dimensional drawings are often included in the owner’s manual or available from the manufacturer, aiding in accurate installation and preventing interference.
Ball Size Requirements
Proper ball size is critical for the safe and secure operation of the Eaz-Lift Recurve R3 weight distribution hitch. Using an incorrect ball size can lead to detachment and potentially catastrophic accidents.
The Recurve R3 system is designed to work with a 2-inch or 2 5/16-inch hitch ball, depending on the specific kit and trailer coupler requirements. Always verify the coupler’s ball size before selecting a hitch ball.
Ensure the hitch ball is in good condition, free from wear, and properly tightened to the vehicle’s receiver. A loose or damaged ball can compromise the connection. Refer to the owner’s manual for torque specifications and recommended ball types for optimal performance and safety.